Using GatsbyJS & Netlify to Create and Deploy a Website
Table of Contents
I came across GatsbyJS while I was learning and using React but didn’t pay much attention to it.
As I’ve been using React more and more, almost all of my projects are created using it.
With my latest project, ActionBuddy for Writers, I needed to create a marketing website and thought it might be a good time to look into GatsyJS in a bit more detail.
I have been pleasantly surprised since I’ve started using it and might possibly be using it more for marketing websites and blogs going forward.
But what is it exactly?
What is GatsbyJS?
GatsbyJS is a site generator that was created using React and GraphQL which makes it extremely fast.
Unlike other technologies such as, WordPress for example, that needs to request data from a database, GatsbyJS gets all the data for the website and displays it according to what is being viewed.
Because of this, the loading time for the website or blog is almost instant which in turn means it has a big advantage when it comes to SEO.
If you are already using React, it makes it even better because you don’t need to learn another language such as PHP, you will still be using Javascript.
What about GraphQL?
GraphQL is another technology created by Facebook that makes it easier to request data in a standard format.

To find out more, you can go to their website.
Before using GatsbyJS my GraphQL experience was none, but after going through their documentation and a bit of Googling I was able to use it.
Another big benefit for me was that it integrated seamlessly with another service I use for my React projects, Netlify.
Netlify has a starter project you can use to create and deploy a GatsbyJS website.
Let’s take a closer look.
Getting started with GatsbyJS and Netlify
Before we begin, make sure you have a Netlify account, if you don’t create one here.

If you are using GitHub, GitLab or Bitbucket it is easier to use these as Netlify needs to be linked to a Git source in order to deploy.
Once you’ve created your account you can set up your Gatsby website using the following steps from Netlify.
After setting everything up, your website should have a unique Netlify URL, something like this:
sleepy-jennings-113322.netlify.com
As soon as you push source code updates your website will be automatically deployed and updated as well.
It is as simple as that.
You might be thinking this is perfect for a developer but what about people that aren’t and need to update the website?
WordPress has its own CMS.
Well, Netlify created their own CMS for Gatsby.
It doesn’t offer as much as WordPress but provides an easy to use user interface for updating content on a Gatsby website.

You can find out more about it here.
What about plugins like WordPress?
Luckily Gatsby has a few of its own plugins just like WordPress.
I’m going to go through a few I’ve already configured and used.
- gatsby-image (as well as gatsby-plugin-sharp)
This plugin uses the Sharp library to quickly and efficiently optimize all the images used on your website.
Install the plugin and include it in your config.
Google Analytics is common among any website or blog so it makes sense that Gatsby would have a plugin for it.
All you need to do is install the plugin and include it in your config.
Don’t forget to add your details so that it tracks the right website.
I discovered HotJar a while ago and haven’t looked back since.
Sometimes you want to see more than numbers and graphs which is where they come in.
HotJar records user sessions which you can then playback to see what exactly your users are doing on your blog or website.
They also offer heatmaps and a few other insightful tools to understand your users better.
Install the plugin, add it to your config and add your details.
MailChimp is another service that almost every website or blog uses.
This is the only Gatsby plugin that takes a bit more effort to use, but luckily you only have to do it once.
After you have installed the plugin you will need to do some ReactJS coding to get it working.
I went through the plugin documentation and didn’t have any problems.
You might be wondering, all these plugins are great but what about SEO, after all, that is the most important aspect for any blog or website.
Gatsby is already SEO friendly because of the speed it offers, but you also need meta tags which is where this plugin steps in.
It works similarly to WordPress, you can setup it up in one place and the rest is taken care for you.
Even though Gatsby is created using ReactJS, you can still create a sitemap for your website or blog.
Sitemaps are important for SEO and it is required when adding your website to Google Webmaster Tools.
Install the plugin and include it in your config.
If you’re like me and you use Sass in your projects, you will still be able to by including this plugin.
As with the other plugins, just install it and include in your config.
I believe these plugins cover most use cases when it comes to the needs of a website or blog.
If you need something else, I’m sure there will be a plugin for it, just Google what you’re looking for and include Gatsby plugin.
Besides these plugins, you can take your Gatsby website further by optimizing it using Netlify.
Optmizing even more using Netlify
Netlify offers some great optimizing options that happen in the background.
I want to show what settings you can use to optimize your Gatsby website even more.
Click on one of your projects after logging into Netlify and go to the Settings.
Then go to the Build & Deploy section.
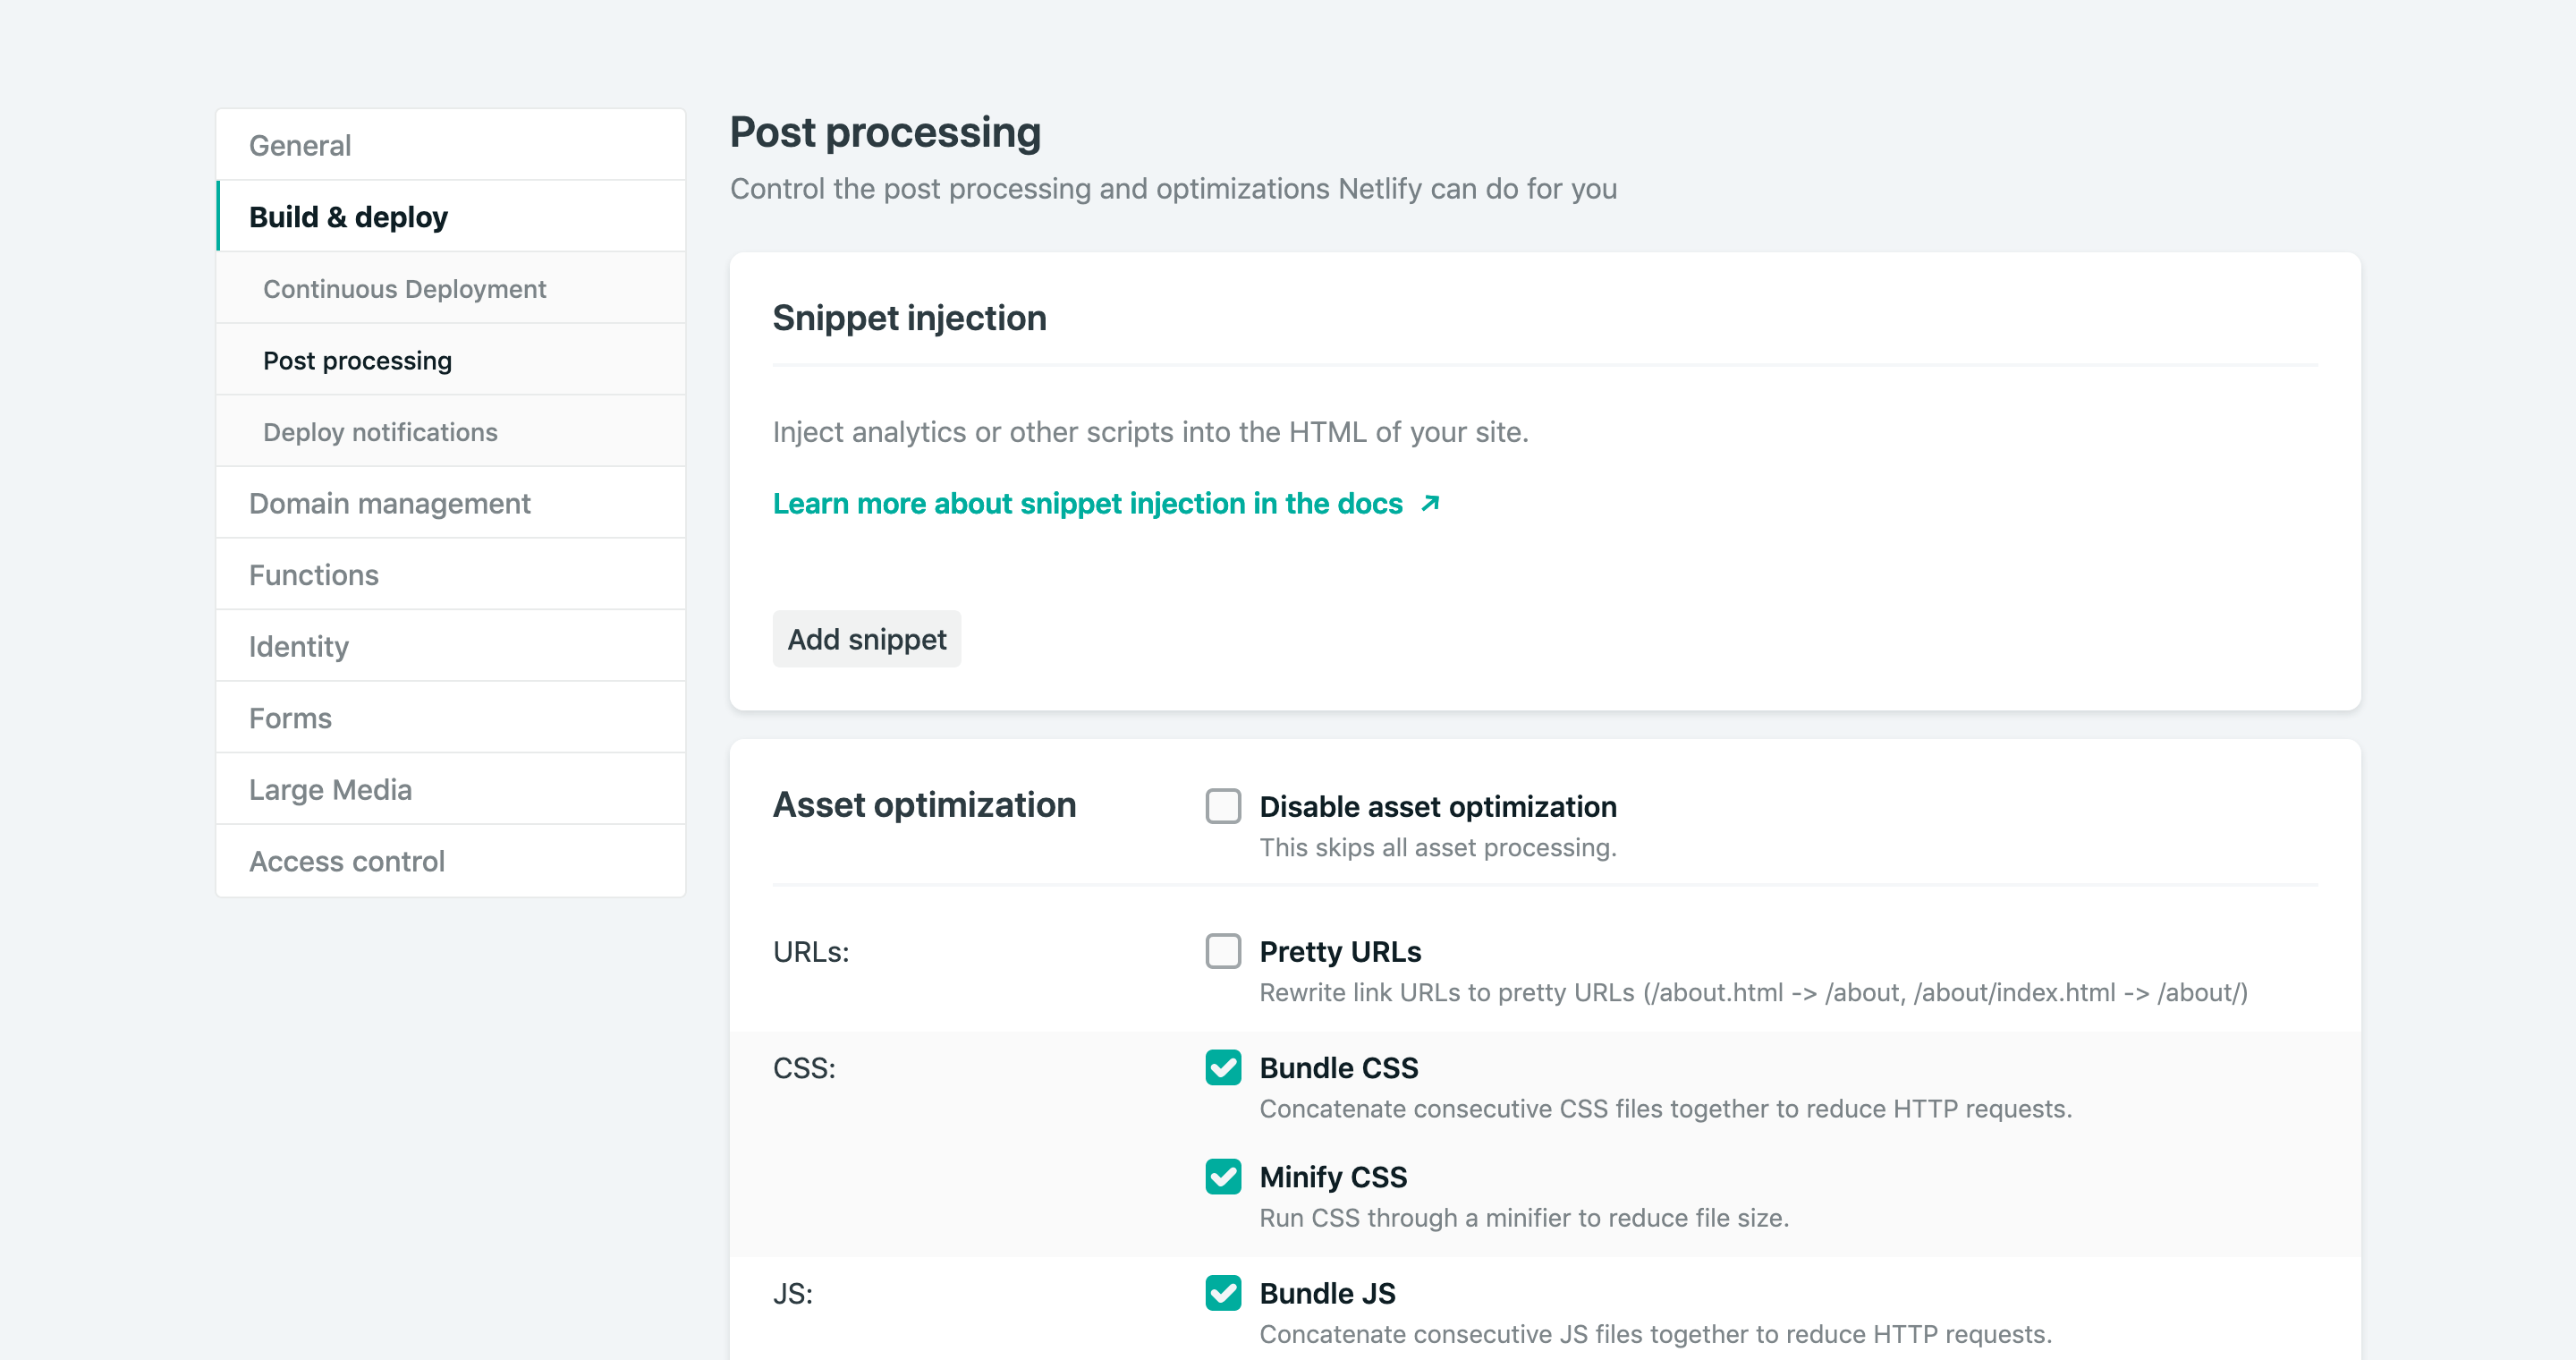
If you scroll down you will see a Post processing heading.
The first thing you can optimize is your assets which includes CSS, JS, and images.
Because we are using React, you can disable the Pretty URLs setting.
You can also pre-render your Gatsby website so that search engines can crawl it which will improve your SEO.
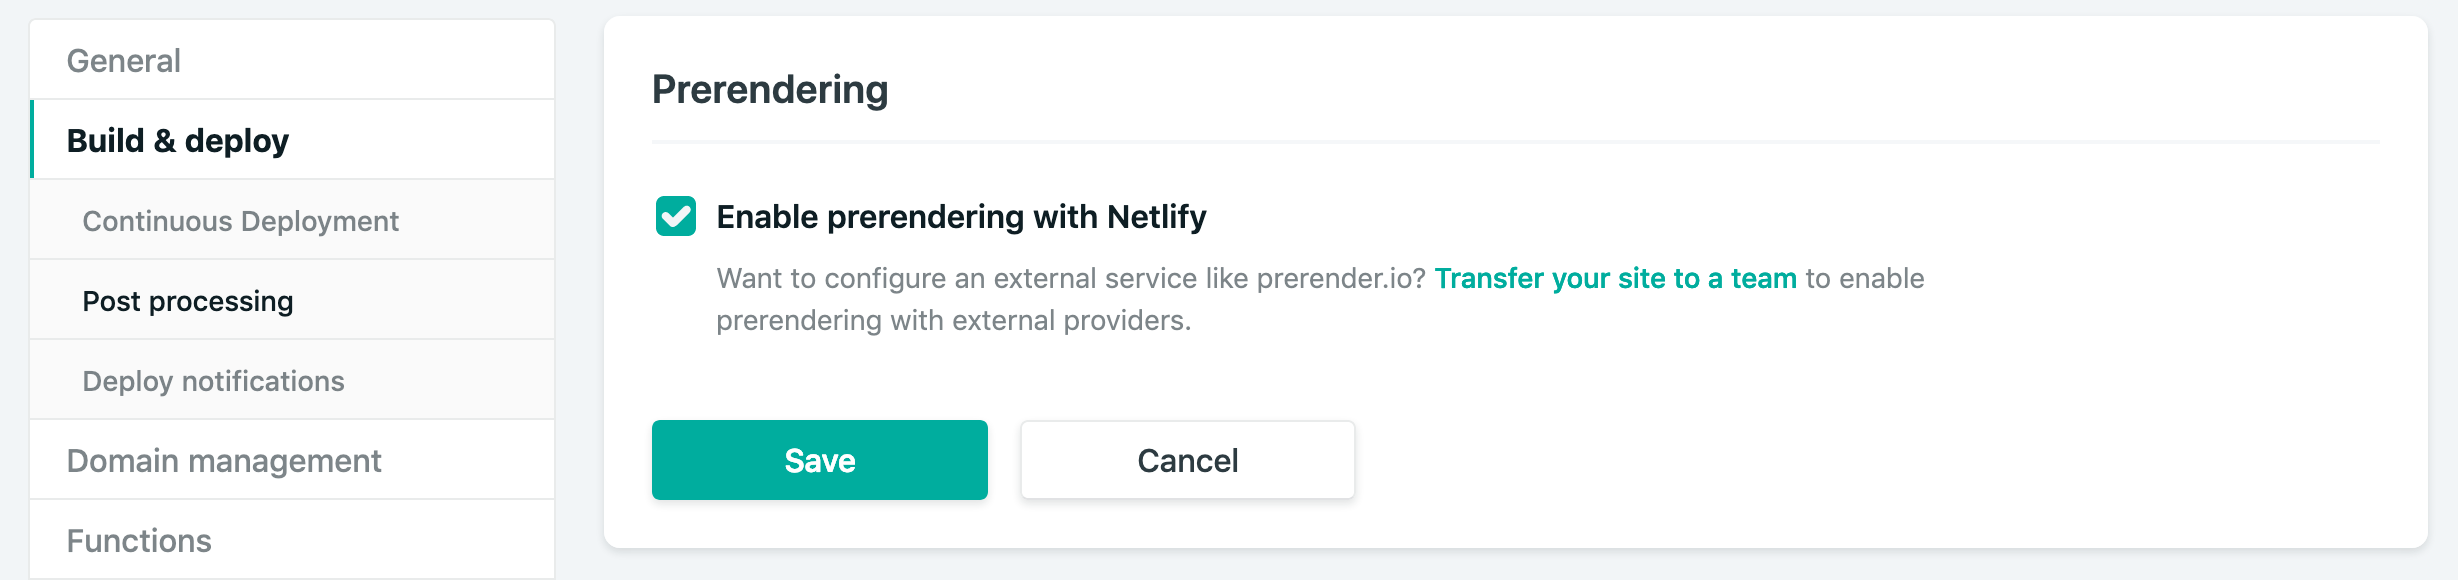
By enabling these two settings in Netlify you will greatly improve the performance of your Gatsby website.
Summary
Even though Gatsby takes a little more effort than say WordPress, I think it is a viable solution to creating a website or blog.
Not to mention that if you deploy using Netlify there is no hosting costs which makes it very cost effective.
The only cost will be having a custom domain.
I am not saying WordPress is not worth it, I think it still has its place.
My personal website still uses WordPress as well as another blog I have which focuses on WordPress.
I hope you enjoyed this post and let me know your thoughts in the comments below.